Update 20th June 2003
The chassis is now coated gloss black, the front scuttle is blasted and in etch primer, the boot, bonnet and front grill are at the laminators, the aluminium interior panels are at the powder coaters and the front wings are ready to go to the laminators. The rear wings still require a bit of filling. So things are moving on.
I am currently trying to order all the parts I will require for the build up of the vehicle, items such as fasteners, rivets, gaskets, P clips, O rings, hose clamps plus probably many other items I have not realised I will need!
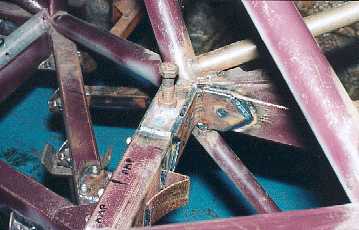
Because the engine is effectively in the car I am worried it about it ripping
out of its mounts in a big accident and crushing me. So I am going to restrain
the engine with a big cable. This is one of the mounts. It is in a strong
part of the chassis and I have added spreader plates.

As the chassis is to be blasted I have to fill all the holes in the chassis
to prevent it getting full of sand. So every rivnut had a bolt inserted.

So the chassis could be moved safely I made these chassis stands.
The tubes on the chassis will also take the axle stands when the
car is built. Due to having a flat floor there will be no safe place
for conventional stands.

As the front wings are fibreglass I reinforced the underside to give
them some stiffness.

The wings at brother Robins. He is preparing them for paint.
They will then go to the laminators to have moulds made
and then the final items.

This shows the initial fit of the wood for the windscreen top and the hood frame.

All the holes in the floor required countersinking so countersunk
head bolts would give a smooth underneath. I screwed a big
piece of MDF onto the drill table to give me a larger surface to
work on while drilling the large sheets. The clamps are the best I have
ever used and about 10 times better than the more common Mole grips.
They give a much better more even clamping pressure.
I will buy some more one day when I can find a supplier.

This shows how smooth the underneath will be.

This is the chassis before blasting. Fortunately I have a metal finishing
company
12 miles away which can blast etch and powder coat. It is a big company
and I was worried about quality, the chassis getting damaged and brackets
bent. So I really tried to emphasise the importance off the job and how
I wanted
the best doing. They quoted a price and I actually said I would prefer to
spend another £50
and them to spend extra time and care getting it right.

This is the chassis after blasting. The company took many pictures for me
of the chassis.

The chassis after coating in a zinc rich primer and polyester gloss
black. I think the
two above pictures are a bit distorted, as one looks long and the other
short.

Once the chassis was home the first job was to remove all the bolts I had
fitted
to stop the chassis filling with sand. This was a very difficult job as
the powder
coating had stuck them in. It took me all day.
Next job was to fit all the panels and drill all the rivet holes.

Final fitting of the panels was time consuming. All the rivet holes
required marking out and drilling, then deburring.

This shows how close I managed to get the panel to fit around the roll
cage. Templates and careful fitting is the secret.

This shows the temporary rivets (commonly known as Clecos)
in use. Originally I had 10 plus another 10 borrowed from a car building
friend
(Cossy Minor but don't tell anyone because its meant to be secret!). We
decided
we required a few more and ending up buying 100 from the States. Ordered
on Monday here on Friday and even though the carriage cost more than the
Clecos they still worked out nearly half the cost of buying in the UK!!

This shows most of the panels. Each one is hand made. No wonder the car
is taking
so long to build. Each panel required final fitting into the car, most needed
a bit of tweaking
(corners trimmed to clear welds or powder coating) and rivet holes drilling.
I worked like crazy to get these panels done for Friday (starting on a
Sunday) so they could go to
the powder coaters. If they did not go on Friday the next earliest time
would be
the following Thursday (due to work). On the two days I had to work (I only
work part time) I did 3 hours
each evening, and on the other days I was in the garage before 7.30am and
worked until 9pm. All I did was work
eat or sleep.